Modification | |
| Prev | Triangulations | Next |
There are many ways of modifying a 3-manifold triangulation. Many of these can be found in the various menus, which appear when you open a triangulation for viewing.
Caution
If you open one triangulation for viewing but then select another in the packet tree, all modifications will apply to the triangulation that you have open for viewing.
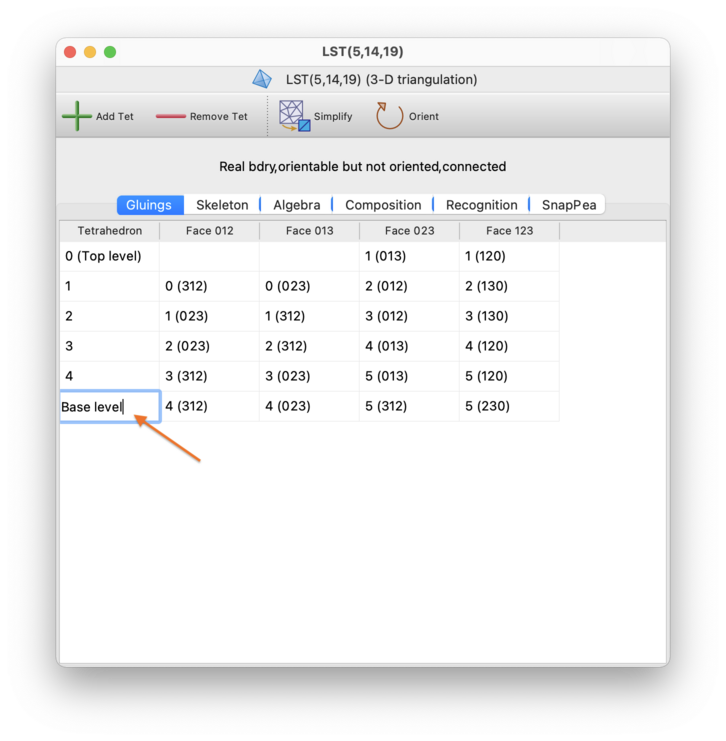
The simplest way to modify a triangulation is to open the Gluings tab and edit the facet gluings table directly. This allows you to change the gluings between triangles, tetrahedra or pentachora for 2-, 3- and 4-manifolds respectively. See the notes on viewing facet gluings for details on how to read the table.
You can add and remove triangles, tetrahedra or pentachora using the + and − buttons below the table. To change the gluings between existing triangles, tetrahedra or pentachora, just type the new gluings directly into the table. If you want to remove a gluing (i.e., make a facet part of the triangulation boundary), simply delete the contents of the cell.
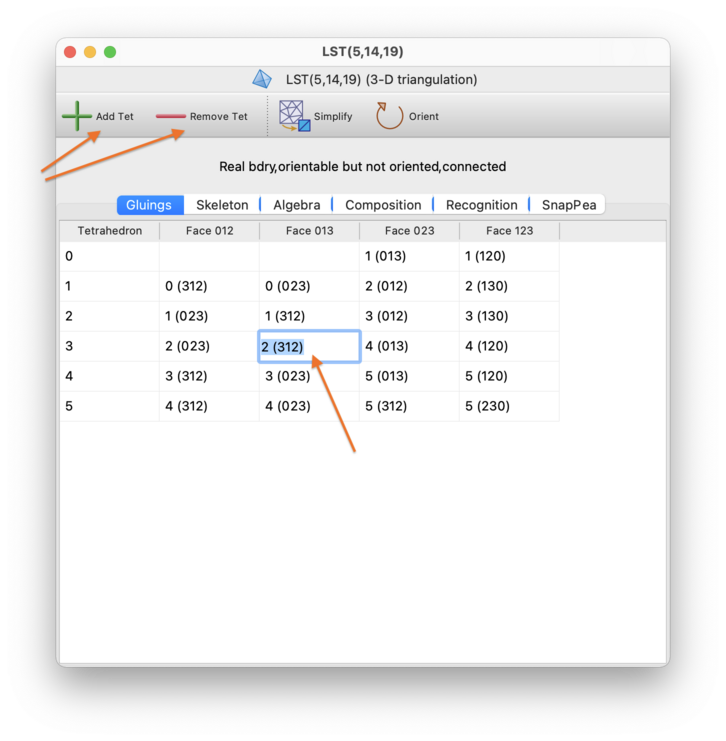
If you like, you can also name triangles, tetrahedra or pentachora to help keep track of their roles within the triangulation. Click on the cell in the leftmost column (containing the number that identifies that triangle, tetrahedron or pentachoron), and type a new name directly into the cell.
If you are using simplex and/or facet locks, you can add or remove locks by right-clicking on the corresponding table cells. If your triangulation does include locks, there will also be a button beneath the table that can remove all locks at once. See the section on simplex and facet locks for more information.
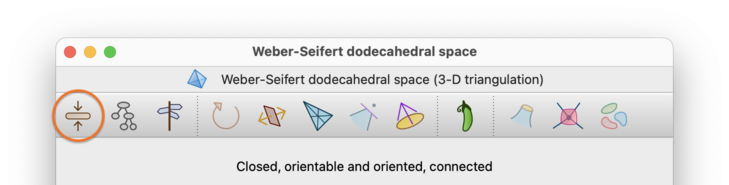
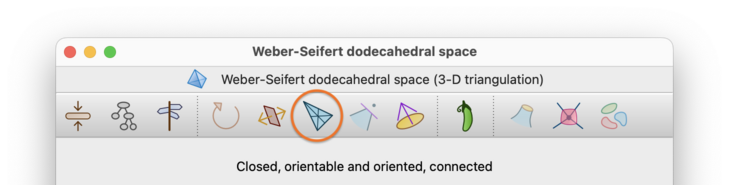
Regina has a rich set of local moves for simplifying a triangulation without changing the underlying manifold. If you select → from the menu or press the corresponding toolbar button, then Regina will use a combination of these moves to reduce the triangulation to as few tetrahedra (in 3-D) or pentachora (in 4-D) as it can [Bur13]. Whilst this procedure is fast and often very effective, there is no guarantee that this will produce the smallest possible triangulation: Regina might get stuck at a local minimum from which it cannot see how to escape.

If your triangulation has boundary, this process will also try to make the number of boundary triangles (in 3-D) or boundary tetrahedra (in 4-D) as small as it can, though again there is no guarantee of reaching a global minimum.
If your triangulation is oriented, then this fast simplification process will always preserve the orientation of your triangulation. This is not true of the exhautive process described below (when you press the button)—that exhaustive process can have the side-effect of flipping the orientations of one or more top-dimensional simplices.
Simplification in Regina will always respect simplex and facet locks.
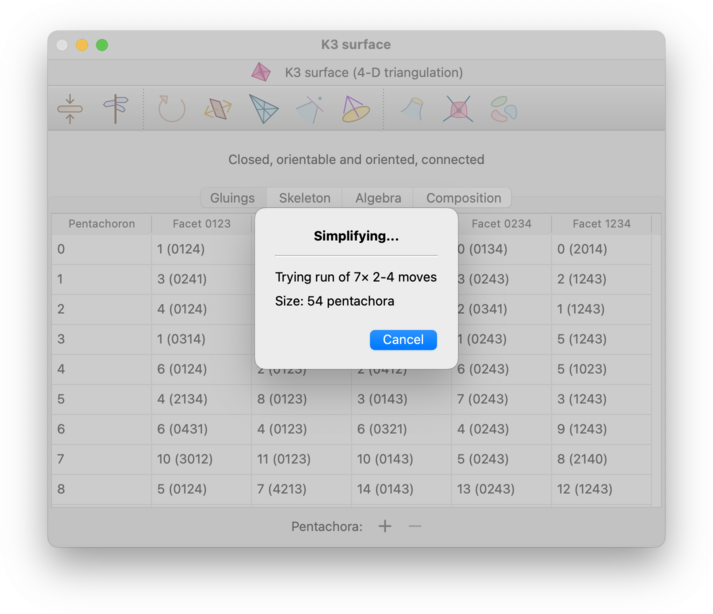
In dimension 4, simplification is significantly more difficult than it is in lower dimensions (indeed, finding a minimal triangulation is algorithmically undecidable). Regina therefore works harder in dimension 4 to climb out of local minima, and for larger triangulations this can take some time. Because of this, in dimension 4 Regina will show the current state of progress, and you can cancel at any time. If you do cancel then Regina will use whatever improvements it has already found so far.
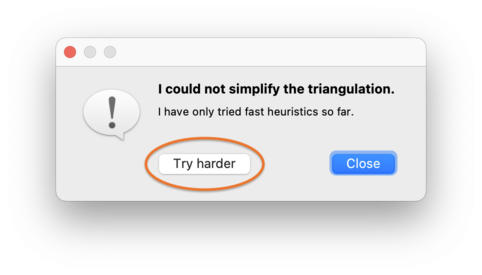
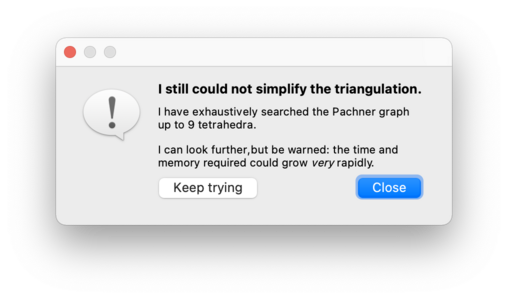
If Regina cannot simplify the triangulation using the fast process described above, then it will offer to perform a slower, more exhaustive search. Press the Try harder button, as shown below:
At this point, Regina will begin an exhaustive search through the Pachner graph (i.e., the graph that relates all triangulations of the underlying manifold through Pachner moves):
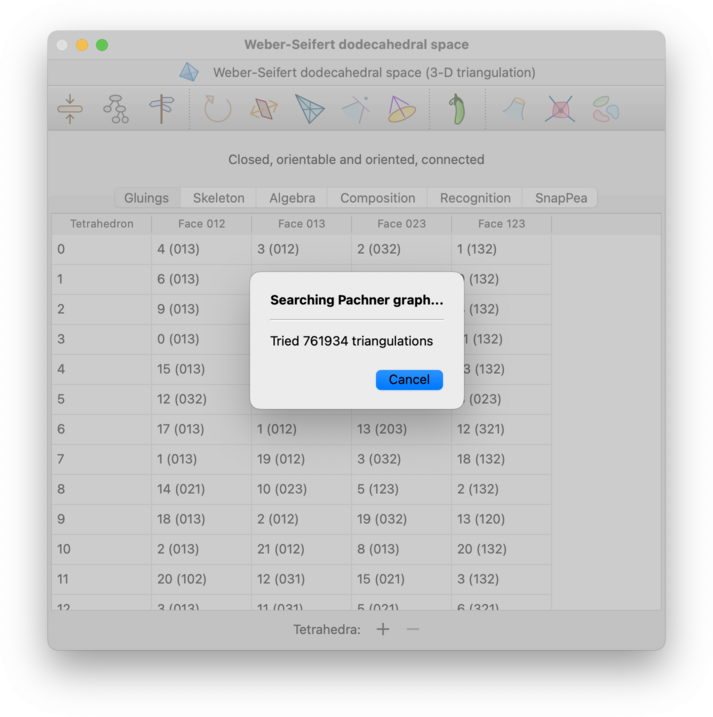
You can stop this search at any time by pressing the Cancel button.
For 3-manifolds, Regina will only try 2-3 and 3-2 Pachner moves in this exhaustive search. For 4-manifolds, Regina will try all possible Pachner moves (1-5, 2-4, 3-3, 4-2, and 5-1).
Since the Pachner graph is infinite, Regina will only search through intermediate triangulations of a certain maximum size. If this still fails, it will offer to search further, and you can press Keep trying to continue the search using larger intermediate triangulations than before. This cycle of ever-expanding searches will continue for as long as you like: Regina will only stop if you decline to keep searching, or you cancel a search while it is running, or it finds a smaller triangulation.
Be warned: unlike the fast simplification that happens when you first press the Simplify button or menu item, this exhaustive search through the Pachner graph does not preserve orientation. If your triangulation is oriented, this exhaustive search can flip the orientations of one or more top-dimensional simplices, and indeed the resulting triangulation might not be oriented at all.
This exhaustive simplification will however always respect simplex and facet locks (like the fast simplification process before it).
Warning
When searching the Pachner graph, both the time and memory consumption grow at a super-exponential rate relative to the number of tetrahedra. If you continue to press Keep trying over and over, you may well run out of time or memory (or both).
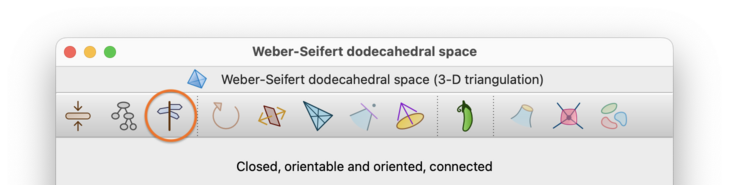
Instead of using automatic simplification, you might wish to modify your triangulation manually one step at a time. You can do this using elementary moves, which are small local modifications to the triangulation that preserve the underlying manifold. To perform elementary moves, select → from the menu or press the corresponding toolbar button.

This will bring up a box containing all the elementary moves that can be performed upon your triangulation. There are many different types of moves available, and this list may continue to grow with future releases of Regina.
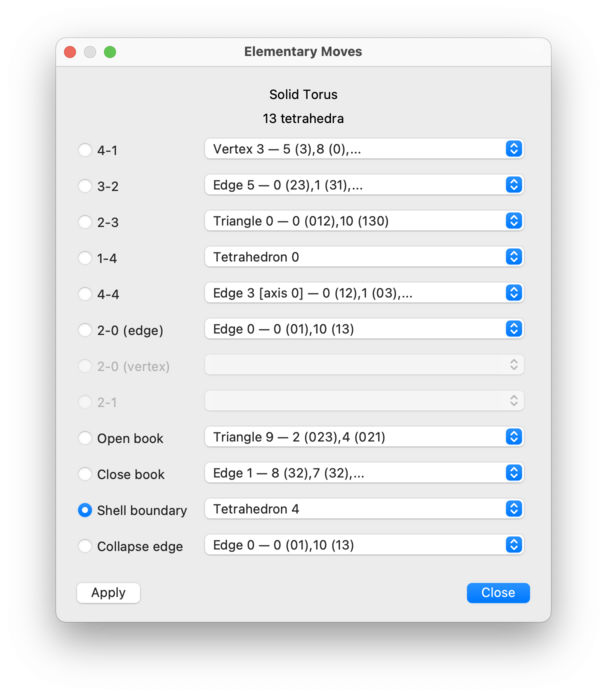
For each type of move, you will be offered a drop-down list of locations at which the move can be performed. If a move is disabled (greyed out), this means there are no suitable locations in your triangulation for that move type.
Select a move, and then press to perform it. You may continue to apply one move after another. When you are done, press to close the elementary move box.
If your triangulation is oriented, these moves will always preserve the orientation of your triangulation.
These moves will also respect simplex and facet locks—any move that would violate a lock will not be offered in the relevant drop-down list.
Below we give a brief summary of the various types of move that are available in each dimension. The full details are in the API documentation, and for 3-manifolds you can also read about them in plain English [Bur13].
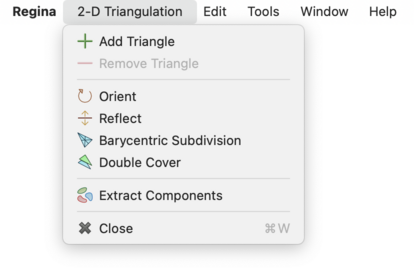
For 2-manifold triangulations, Regina offers the following selection of moves:
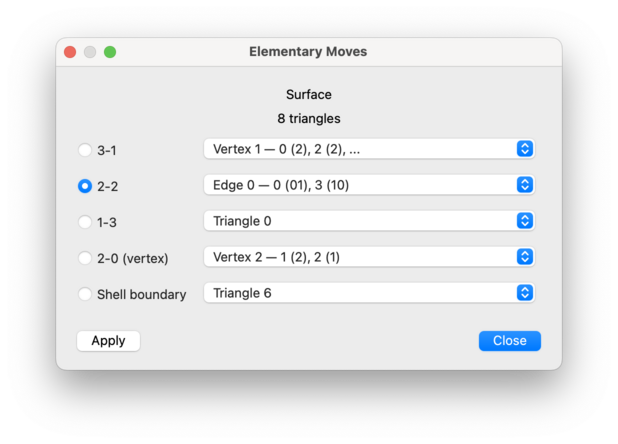
- 3-1 Move
Replaces three triangles surrounding a degree 3 vertex with a single triangle.
- 2-2 Move
Replaces two triangles joined along a common edge with two different triangles joined along a new edge that crosses through the original edge.
- 1-3 Move
Replaces one triangle with three triangles that meet at a new internal degree 3 vertex.
- 2-0 Move (Vertex)
Takes two triangles that meet at a degree 2 vertex and squashes them flat.
- Shell Boundary
Removes an “unnecessary triangle” that sits along the boundary of the triangulation.
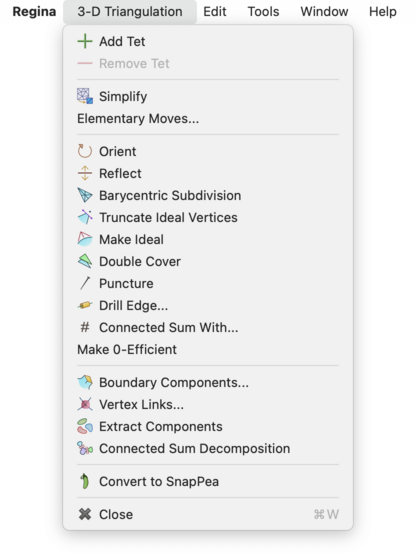
For 3-manifold triangulations, Regina offers the following selection of moves:
- 4-1 Move
Replaces four tetrahedra meeting at a degree 4 vertex with a single tetrahedron.
- 3-2 Move
Replaces three tetrahedra joined along a degree 3 edge with two tetrahedra joined along a triangle.
- 2-3 Move
Replaces two tetrahedra joined along a triangle with three tetrahedra joined along a degree 3 edge.
- 1-4 Move
Replaces one tetrahedron with four tetrahedra that meet at a new internal degree 4 vertex.
- 4-4 Move
Replaces four tetrahedra joined along a degree 4 edge with four tetrahedra joined along a new degree 4 edge that points in a different direction.
- 2-0 Move (Edge)
Takes two tetrahedra joined along a degree 2 edge and squashes them flat.
- 2-0 Move (Vertex)
Takes two tetrahedra that meet at a degree 2 vertex and squashes them flat.
- 2-1 Move
Merges the tetrahedron containing a degree 1 edge with an adjacent tetrahedron.
- Open Book
Takes an internal triangle with two boundary edges and “unglues” that triangle, creating two new boundary triangles and exposing the tetrahedra inside to the boundary.
- Close Book
Folds together two adjacent boundary triangles around a common boundary edge, with the result of simplifying the boundary.
- Shell Boundary
Removes an “unnecessary tetrahedron” that sits along the boundary of the triangulation.
- Collapse Edge
Takes an edge between two distinct vertices and collapses it to a point. Any tetrahedra that contained the edge will be “flattened away”.
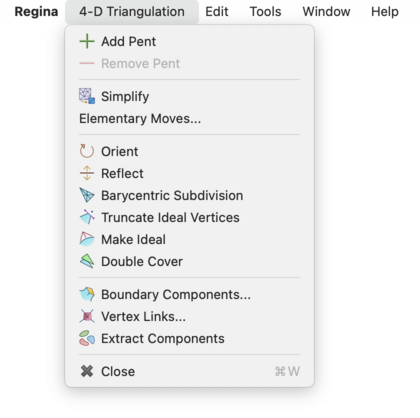
For 4-manifold triangulations, Regina offers the following selection of moves:
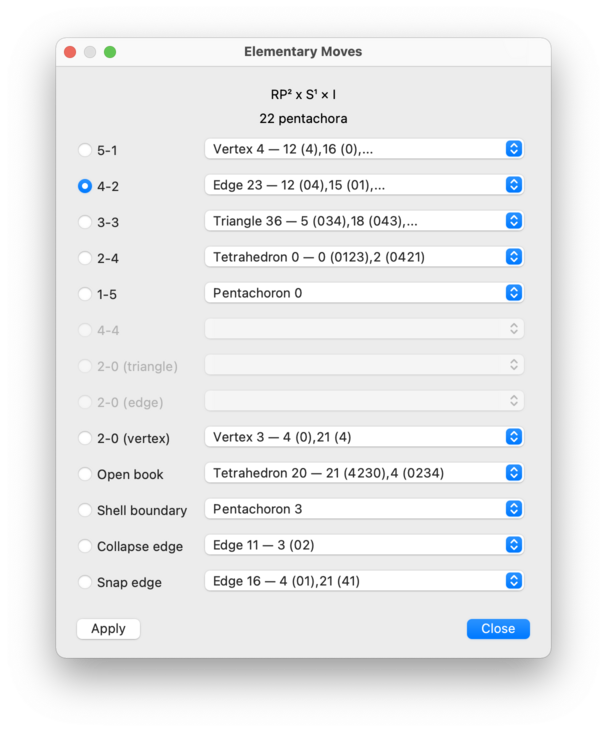
- 5-1 Move
Replaces five pentachora meeting at a degree 5 vertex with a single pentachoron.
- 4-2 Move
Replaces four pentachora joined along a degree 4 edge with two pentachora glued together along a tetrahedron.
- 3-3 Move
Replaces three pentachora joined along a degree 3 triangle with three pentachora joined along a new degree 3 triangle that is aligned in a different direction.
- 2-4 Move
Replaces two pentachora glued together along a tetrahedron with four pentachora joined along a new degree 4 edge.
- 1-5 Move
Replaces one pentachoron with five pentachora that meet at a new internal degree 5 vertex.
- 4-4 Move
Replaces four pentachora joined along a degree 4 edge with four pentachora joined along a new degree 4 edge that is aligned in a different direction.
- 2-0 Move (Triangle)
Takes two pentachora joined along a degree 2 triangle and squashes them flat.
- 2-0 Move (Edge)
Takes two pentachora joined along a degree 2 edge and squashes them flat.
- 2-0 Move (Vertex)
Takes two pentachora that meet at a degree 2 vertex and squashes them flat.
- Open Book
Takes an internal tetrahedron with one, two or three boundary triangles and “unglues” that tetrahedron, creating two new boundary tetrahedra and exposing the pentachora inside to the boundary.
- Shell Boundary
Removes an “unnecessary pentachoron” that sits along the boundary of the triangulation.
- Collapse Edge
Takes an edge between two distinct vertices and collapses it to a point. Any pentachora that contained the edge will be “flattened away”.
- Snap Edge
Takes an edge between two distinct vertices and snaps its endpoints together. This involves taking a triangle that meets this edge and folding the other two edges of this triangle together.
Instead of trying to reduce the number of top-dimensional simplices, you can also ask Regina to try to reduce the treewidth of the triangulation. Treewidth is a measure of how tree-like the dual 4-valent graph is, and reducing the treewidth is important because it can significantly speed up difficult computations such as Turaev-Viro invariants.
To reduce the treewidth, select → from the menu or press the corresponding toolbar button.

Regina will begin to explore the Pachner graph in search of a smaller treewidth diagram, in a similar manner to the exhaustive simplification process described above. Like exhaustive simplification, Regina will occasionally stop and offer to expand its search; also, like exhaustive simplification, you can cancel the search at any time.
It is important to understand that Regina does not compute the precise treewidth of a triangulation (i.e., the minimum width of a tree decomposition), since this is an NP-hard problem. Instead it uses fast heuristics to find a low-width tree decomposition for a given triangulation, and it is this “heuristic width” that will be reduced.
As with exhaustive simplification, this operation does not preserve the orientation of an oriented triangulation: it could flip the orientations of one or more top-dimensional simplices, and the resulting triangulation might not be oriented at all.
This operation does respect simplex and facet locks.
Warning
As with exhaustive simplification, both time and memory consumption grow at a super-exponential rate as the search expands.
A 3-manifold triangulation is 0-efficient if its only normal spheres and discs are vertex linking, and if it has no 2-sphere boundary components [JR03]. 0-efficient triangulations have significant theoretical and practical advantages, and often use relatively few tetrahedra.
If your triangulation is closed, orientable and connected, you can convert it into a 0-efficient triangulation of the same 3-manifold by selecting →.

If your triangulation represents a composite 3-manifold then it cannot be made 0-efficient—in this case a full connected sum decomposition will be inserted beneath your triangulation in the packet tree, and your original triangulation will be left unchanged.
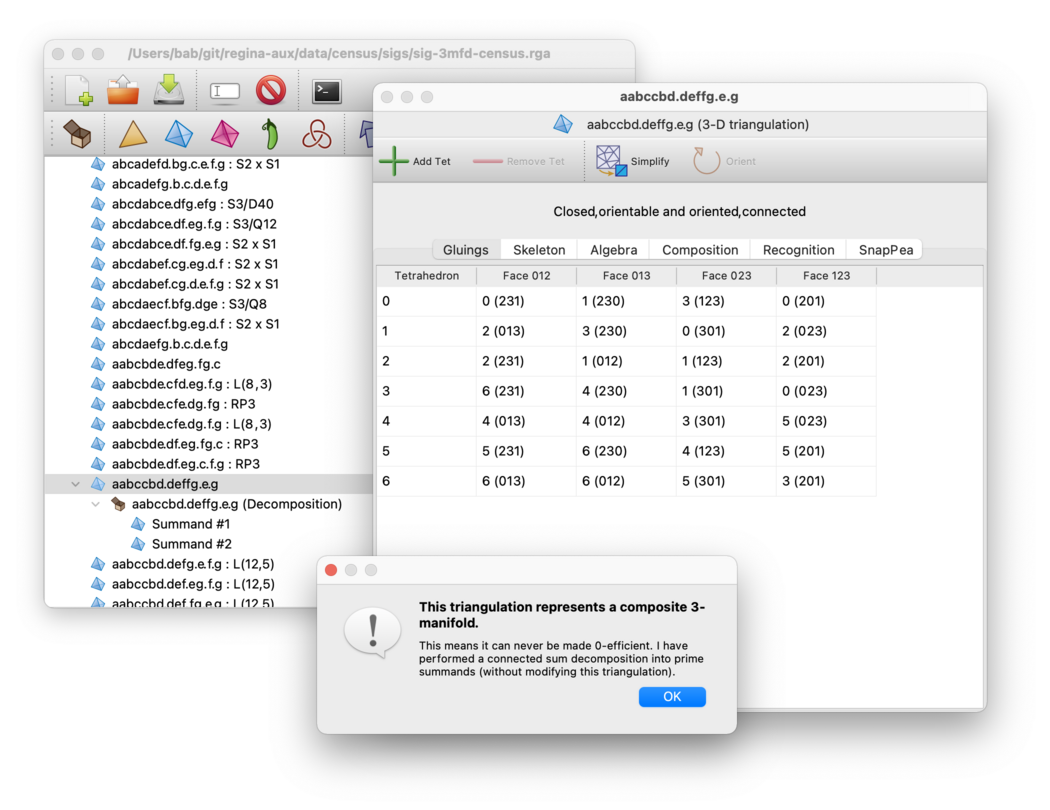
There are also two exceptional prime orientable manifolds that cannot be made 0-efficient: RP3 and S2×S1. Regina will notify you if your triangulation represents one of these manifolds.
Be aware that this operation might not preserve orientation.
In particular, given the way that the 0-efficiency algorithm works,
it is not clear how to maintain the orientation of the lens space
L(3,1) (or any L(3,1) summands
of a composite manifold).
This operation also does not work well with simplex and facet locks, since it might require large-scale changes to the triangulation (or even possibly a wholesale replacement of the triangulation), as opposed to simpler combinatorial moves or operations. Therefore, if there are any locks in your triangulation:
these locks will not prevent the operation from taking place;
if the triangulation does change directly, then all locks will be removed entirely;
if the triangulation represents a composite manifold, then the summands that are inserted into the packet tree will likewise have no locks at all;
in all cases where the original triangulation is not changed, its locks will be kept unchanged also.
Caution
The algorithm to make a triangulation 0-efficient runs in worst-case exponential time, though it is often still extremely fast in practice. If your triangulation is large, you should consider whether automatic simplification will suffice: this is much faster at reducing the number of tetrahedra, and often produces a 0-efficient result. You can test the result for 0-efficiency via the recognition tab.
Regina can convert ideal boundary components (formed from individual vertices with closed non-spherical vertex links) into real boundary components (formed from boundary triangles in 3-D, or boundary tetrahedra in 4-D). To do this, select → from the menu or press the corresponding toolbar button. Regina will subdivide the triangulation and delete a small neighbourhood of each ideal vertex. Any invalid vertices will be truncated also.

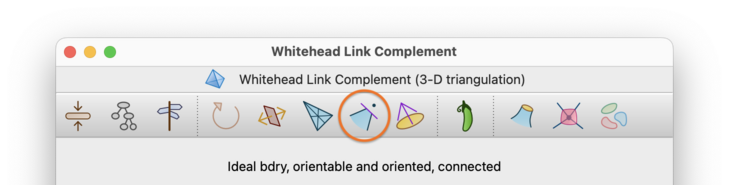
Be aware that, after truncating ideal vertices, the triangulation will not be oriented (even if it was before).
If your triangulation has any simplex and/or facet locks, then Regina will refuse to truncate ideal vertices (since every top-dimensional simplex and every facet could potentially be subdivided).
In dimension 3 you can also truncate individual vertices, regardless of whether they are ideal or not. To do this, select → from the menu. You will be asked which vertex you wish to truncate.

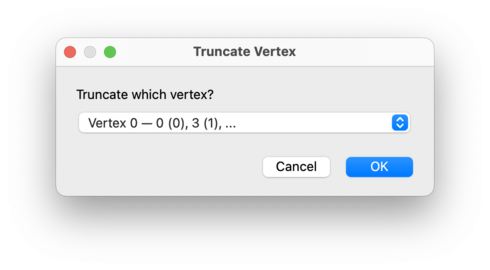
As before, the resulting triangulation will not be oriented; moreover, if you have any simplex and/or facet locks then Regina will refuse to truncate individual vertices at all.
Tip
Truncating vertices can greatly increase the size of the triangulation (this is a side-effect of the subdivision). After you truncate vertices, you will probably want to simplify your triangulation.
As a converse to truncation, you can also convert real boundary components (formed from boundary triangles in 3-D, or boundary tetrahedra in 4-D) into ideal boundary components (formed from vertices with closed non-spherical vertex links). To do this, select → from the menu or press the corresponding toolbar button.

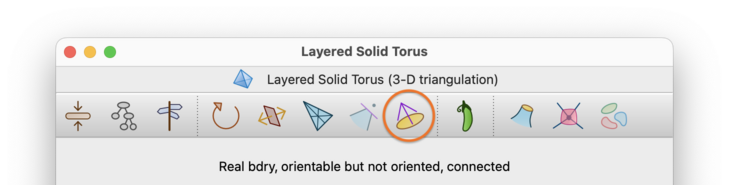
Each real boundary component will be “coned” to a new ideal vertex: in 3-D this means adding one new tetrahedron for each boundary triangle, or in 4-D one new pentachoron for each boundary tetrahedron.
Your boundary components will all become ideal, but there are some caveats:
Your triangulation will contain new ideal vertices as described above, but also internal vertices whose links are spheres. To get rid of these internal vertices, try simplifying your triangulation.
Any spherical boundary components will disappear entirely; that is, they will be filled in with balls.
Be aware that, if your triangulation is oriented, it might not be oriented after this operation is complete.
This operation will however respect any simplex and/or facet locks. Specifically, if any boundary facets are locked then Regina will refuse to convert real to ideal boundary.
You can perform a barycentric subdivision on your triangulation by selecting → from the menu or pressing the corresponding toolbar button. In 2-D this involves splitting each original triangle into 6 = 3! smaller triangles, with new vertices added at the centroid of each original triangle and the centre of each original edge. In 3-D this involves splitting each original tetrahedron into 24 = 4! smaller tetrahedra, with new vertices at the centroid of each original tetrahedron, triangle and edge. In 4-D, each original pentachoron splits into 120 = 5! smaller pentachora, with new vertices added in a similar fashion.

If your triangulation is oriented, then barycentric subdivision will preserve the orientation of your triangulation.
If your triangulation has any simplex and/or facet locks, then Regina will refuse to subdivide (since every top-dimensional simplex and every facet would be affected).
If your triangulation is orientable but not oriented, you may wish to reorder the vertices of each top-dimensional simplex (e.g., vertices 0,1,2,3 of each tetrahedron in a 3-manifold) so that adjacent simplices have consistent orientations. To do this, select → from the menu or press the corresponding toolbar button.

You can reorder the vertices of each top-dimensional simplex to have the opposite orientation by selecting → from the menu or pressing the corresponding toolbar button. Regardless of whether the triangulation is orientable and/or oriented, every top-dimensional simplex will have its orientation reversed. This will change the vertex numbers within each top-dimensional simplex, but not the simplex numbers themselves.

If your triangulation has any simplex and/or facet locks, then both of these operations (orienting and reflecting) will maintain these locks (i.e., the locks will be transformed correctly according to whatever relabelling takes place).
As a note, you can also create the orientable double cover of a non-orientable triangulation. Since Regina 7.4, this operation no longer changes the triangulation directly; instead it creates a new triangulation beneath the original in the packet tree.
You can puncture a 3-manifold triangulation; that is, remove a small ball from its interior and retriangulate. To do this, select → from the menu.

This will work correctly regardless of whether the triangulation is closed, ideal, and/or has real boundary triangles. There will be a new 2-sphere boundary, formed from two new boundary triangles.
If your triangulation is oriented, then puncturing will always preserve the orientation of your triangulation.
If you have any simplex and/or facet locks on your triangulation, these will not prevent you from puncturing the triangulation. This is because the puncturing algorithm works in a safe way that preserves all pre-existing top-dimensional simplices, facets and/or boundary facets, which means that locks will never be violated.
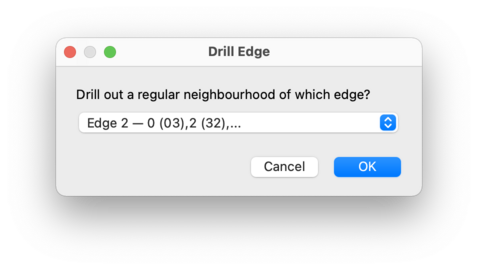
You can also drill out a small regular neighbourhood of an edge of your triangulation. To do this, select → from the menu.

You will be asked which edge to drill out, as illustrated below. For each available edge, the drop-down list shows the edge number (as seen in the skeleton viewer), along with details of the individual tetrahedron edges that combine to form that edge of the triangulation. Boundary edges will not appear in this list, since drilling a boundary edge has no topological effect.
How Regina drills the edge will depend on the type of edge that you select:
Where possible, Regina will produce an ideal triangulation (so the new boundary component produced by the drilling becomes an ideal vertex in the resulting triangulation).
If necessary, Regina will create real boundary components (formed from unglued triangular faces of tetrahedra). This happens, for instance, when the edge runs between two distinct internal vertices (so the drilling produces a sphere boundary).
If drilling would have no topological effect at all, then Regina will do nothing, and instead show a message explaining why. This happens, for example, if the chosen edge connects an internal vertex to a boundary component (either real or ideal).
If the edge runs between two boundary components where at least one is real, then Regina will refuse to drill (since this could produce an enormous number of tetrahedra). You could try converting your triangulation to an ideal triangulation instead, since Regina will happily drill an edge between two ideal vertices.
Unlike most operations on triangulations, drilling an edge will not modify the original triangulation; instead the resulting triangulation will be inserted beneath the original in the packet tree. This is to keep things easy to manage if (for example) you wish to try drilling out several different edges from the same triangulation.
If your triangulation is oriented, then drilling an edge will always preserve the orientation of your triangulation.
If you have any simplex and/or facet locks on your triangulation, these will not prevent you from drilling edges. This is because, like puncturing, the drilling algorithm works in a safe way that preserves all pre-existing top-dimensional simplices, facets and/or boundary facets, which means that locks will never be violated.
You can combine two 3-manifold triangulations by forming their connected
sum. This will convert some triangulation X
into the connected sum
X # Y
for some other triangulation Y
(note that
Y is allowed to be the same as
X).
If both X and Y
are oriented triangulations then
the connected sum will respect these orientations, and will be
oriented also.
The triangulation X must be one of
Regina's native triangulation
packets, since
X will be modified directly.
The triangulation Y may be either a
native triangulation packet or a hybrid
SnapPea triangulation,
since Y will not be modified.
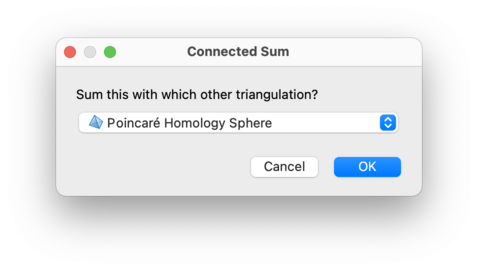
To form this connected sum, first open the the triangulation
X for editing, and then select
→
from the menu.

Regina will ask you which other triangulation to sum with;
in other words, Regina will ask you for the triangulation
Y.
The triangulation X will be changed directly
into the connected sum. The result will most likely contain multiple
vertices, and you may wish to
simplify the resulting
triangulation before proceeding further.
If both of the triangulations that you are summing are oriented, then the result will preserve the original orientations.
If either of the triangulations that you are summing have simplex and/or facet locks, these will not prevent you from forming a connected sum. This is because the summation algorithm works in a safe way that preserves all pre-existing top-dimensional simplices, facets and/or boundary facets, which means that locks will never be violated.
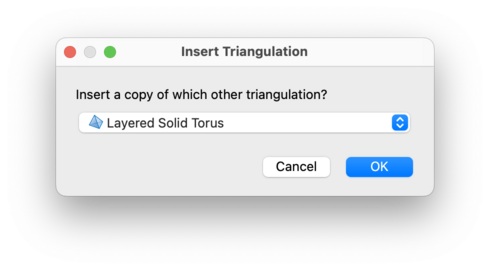
You can also combine two 3-manifold triangulations by forming their
disjoint union. This will convert some triangulation
X into the union
X U Y
for some other triangulation Y
(note that
Y is allowed to be the same as
X).
Essentially, this just inserts a copy of Y
into X.
If both X and Y
are oriented triangulations then
the union will respect these orientations, and will be oriented also.
Again, the triangulation X must be one of
Regina's native triangulation
packets, since
X will be modified directly.
The triangulation Y may be either a
native triangulation packet or a hybrid
SnapPea triangulation,
since Y will not be modified.
To form this disjoint union, first open the the triangulation
X for editing, and then select
→
from the menu.

Regina will ask you which other triangulation to insert;
in other words, Regina will ask you for the triangulation
Y.
The triangulation X will be changed directly
into the disjoint union
X U Y.
If both of the original triangulations are oriented, then (trivially) the result will preserve the original orientations.
Any simplex and/or facet locks in the original triangulations will be included in the resulting triangulation also.
| Prev | Contents | Next |
| Analysis | Up | Simplex and Facet Locks |